Wall of text incoming.
Holy crap. It took a long time but I’m done with it. So to recap, I had the original background, (the one in the trailer) totally sucked, both stylistically and functionally, so I determined I needed to replace it, but I knew it would take a while, so I made a temporary one, which was in the build at Game Wars. it was mostly functional, but utterly bland, and had entirely too much contrast, to boot.
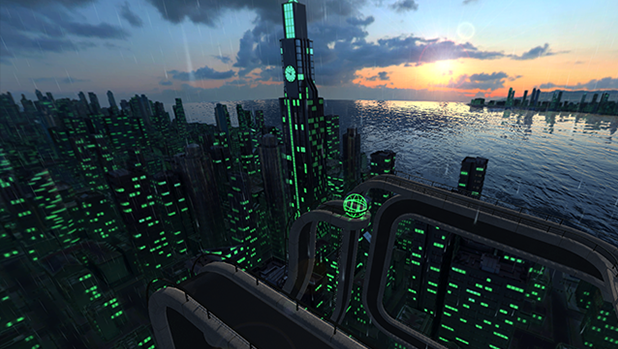
What I ended up doing was this: In maya, I made about 20 buildings in 3 parts each: A base, a ‘floor’ and a top. I also made 2 special buildings that stand out from the others and aren’t at all copied, particularly, a government-type building and a clock tower. (in-game, the time on that clock is accurate to system time. subtle, but totally awesome) While I was doing that, I also wrote a mel script to take those buildings, and some road pieces and randomly generate from that a city, which I won’t delve into because it was actually a lengthy script. I actually had to generate it in 17 zones because not only was my script inefficient, my buildings prioritized fidelity over performance, given their end-use. Even had they been, though, the total area was about 200×200, (1 square being 1 building, road, or part of a multi-cell building) and 40,000-ish buildings is still a lot of buildings. So once I had the city, I needed to generate a cube map from that, so I rendered out the whole thing one piece at a time, so I could composite them later. Each piece needed multiple passes. Altogether there was about 150 renders that went into the final composite.
Then in Photoshop, I combined and composited all of those renders with a photographic sky, a panorama of the rocky mountains that I took from a hill close to home, and a public domain panorama of New York that I found. Most of the work there was in color correcting everything together and in masking by hand all of the lights in the windows. After all that was done, I could then export it as a cube map to Unity.
Once in Unity, I had to set it up all of the dynamic stuff. Separate from all the other renders, I had rendered a couple images of just a white cube, using the same lighting as the others. This allowed me to easily set up lighting that didn’t match, but closely resembled the background. I couldn’t entirely match it because I’m limited, in Unity, to a single directional light and an ambient term, for performance reasons, but it’s close. Then there’s the clock. Since I have the files that were rendered, I could determine precisely the position of the center of the clock relative to the camera. Since that vector is still valid post-render, I could simply make a little clock out of a couple of quads and a particle material, and place it there, and it’d appear to be on the clock.
After that, there’s the ocean. The ocean itself is just a quad with a pseudo-reflective material on it, then I took an animate tiled texture script, (just increments the offset of the texture by some vector every so often) re-tooled it to work with any given texture property, and applied it to the bump property, to simulate waves. Back when I exported the cube map, (as 6 separate .png files) I gave it an alpha, which doesn’t matter as far as the actual sky-box material is concerned, but it allowed me to make a cube that sits in front of the ocean and acts as a mask for it. A pretty neat, if totally ghetto solution.
Then I just needed to optimize the rain I had in the original environment, and I was done.