Greenlight is up

Hey everyone, we’ve been hard at work getting everything set up for the Greenlight and Kickstarter campaigns over the past couple of weeks. Earlier today, we launched our Greenlight campaign! We also have a demo available for download. Tomorrow is when we’ll launch the Kickstarter campaign.

Salt Lake Comic Con

A reminder: We’re going to be at salt lake comic con today through saturday, so if you’re going, look for us there.
We’ll be at booth 521 in hall C. Right next to artist alley and on the main path. Can’t miss us.
We’ll be there as part of the Utah Games Guild, with these other guys.
Also, heads up, we’ll be launching a Kickstarter and Greenlight in a couple of weeks here, so keep an eye out for that as well.

The Music of Momentum: Temporal Analysis

Ladies and Gentlemen–my last blog post was quite lengthy. I hope to keep this one a bit more condensed.

Today, we’ll open with the feeling of the song.

Temporal Analysis was initially written in late winter/early spring. I was a bit nostalgic for the snow when I wrote this, and when I hear it, I feel frost on a window, snow on the grass, and the inevitable change to Spring. The name came, in part, from wildly flipping pages in a dictionary until we found some words we liked.

I’m going to go a little more into depth on the composition of this one, but try to make the post as a whole shorter than the last one, but first, I’m going to introduce you to the instrumentation.

Instruments:

Kick drum–Normally, I like a tight kick drum, but this song called for a big ol’ floppy kick. Normal kicks simply weren’t what I needed, so I mixed it with a dejembe. No eq, just compression.

piano–a bit like the piano in “natural Science,” but more dreamlike. No compression or eq. interestingly, nearly all the piano notes are just 16th notes, with just a bunch of reverb to carry them through.

bass– the bass synth in this song is quite similar to the one in “Natural Science.” Not much else to say.

pad–mix of a square wave and a weird organ pad, with some percussive tines for an attack. Both the organ and the tines have a delay on them.

percussion–The aforementioned kick, a fairly simple snare, some toms, and a high hat.

Air–The other song I used a wind type sound in the background, besides “Natural Science” it is fairly different from the other wind sound, but it was modeled on the other. Reminds me of a snowbank getting swept up by the wind.

Composition:

Notable things include:

Melody–The melody goes back and forth between the piano and the pad–in some places the piano plays quietly along with the pad for an entirely different sound (0:16 is a good place to hear it).

Metronome bass– The bass in this frequently attacks on the downbeat with the kick, and it makes a metronome, or clock-like feel.

Give it a listen, maybe give it a like, leave a comment, and have a great day!

–Isaac

The Music of Momentum: Natural Science

Hey, first let me apologize, I’ve been trying to decide what format to use with these posts, but we’ll go with this for now.

This excerpt is from a song initially called “Natural Philosophy.” We changed it to “Natural Science,” because it just sounded better to us.

First, let me start by saying that I’m not going much into the composition, lest this end up like the other post, full of me waxing elegant. Suffice to say that I wanted make the song simple.

That being said, one of the compositional ideas in this piece (and the only one I’ll get into detail) is the idea of three measures of stuff, then one measure of nothing, with only the momentum of the previous measures to carry it through. I wanted this to replicate that kinda feeling while you’re on a swing set and you get to the top of your swing, then just… hang there for a moment, feeling weightless.

I really like that feeling.

But now on to instrumentation.

Piano–As noted before, I wanted this song to be simple, so the piano part isn’t complicated at all. It isn’t compressed or eq’d, and has a bunch of reverb on it.

In this excerpt, I only really have one synthy synth (every instrument was computer-generated, but this isn’t based off an acoustic instrument). It is the boop kinda noise–it has an arp function on it that makes it automatically repeat every xth note, as well as a filter on the signal which makes it change from a soft boop with a low cutoff to louder beep with a higher cutoff. Also, it has a cool little delay on it, which I often reinforced rhythmically (that is, I put the same notes at the place where the delay was going to hit). I also decided to use the same synth to make a quiet melody, by stopping the note before the filter changed it (the haunting sounds at :30).

Bass–I had initially composed nearly the entire thing without a bass part, just to make it so the melody/harmony didn’t suffer because of an awesome bass part (I’m looking at you, dubstep). I added in an acoustic bass partway through the song, then we decided to change it to be a more gnarly synthetic bass. Also, during part of the song, the piano doubles the bass part to make it just a bit thicker (listen to :24 ish).

Like the bass, I initially didn’t have any percussion in this song. But we did decide to add in a very light percussive part in later–just a couple high hats, a ride, a kick and a snare. I pretty much just sampled it all from a loop, then eq’d and compressed it to taste.

The snare though, took some work–I ended up processing its signal twice, in parallel. Each signal went through some seriously heavy eq and some careful distortion and bunch of other stuff. Both were heavily compressed and some solid reverb went into them as well.

Then, of course, there’s the sssSSHHT (:09). When it first went in, we liked it so much, that we kinda put it everywhere. It was the sshtiest song ever. After a week, we listened to it again and we both went “whut.” It took ages to figure out where it was appropriate, where to replace it with a different sound, and when to remove it all together.

Moving onto the other stuff.

The reverb. it’s is all long and… reverby. In this song, I had a couple different reverbs on the piano at the same time. I also had some on the other important instruments. One of the reverbs I used detunes the signal, which I kinda liked. It fit the mood, as well as making the reverb more… thick. I had to be careful with it though, lest bad stuff happen.

An oddity in this song, is that many of the instruments are panned to several places. What I did was I panned an instrument somewhere, then, in parallel, I swapped the stereo panning and turned down the signal, so they’re panned both to the one place, and also a bit more quietly opposite that. Normally, I would steer clear of stuff like that, but in this song, it worked.

Another oddity about this song is the kinda windy sound that goes through a majority of the song. I initially put it in because, at the time, so little in this song had a lot of high frequency content, and I felt that it sounded empty. For a time, I removed it when I put in the percussion, but found that I liked the song better with it in. I had tried putting it in a few other songs, but it felt wildly inappropriate.

Anyways, that’s all for now. More later.

–Isaac

Preparation for Comic-con

Polish, polish, polish. Lots of polishing.
So, in case you didn’t catch it, we’ll be going to Comic-con. Go there. Check us out. All that jazz. So for the Comic-con build, I’m not actually going to be able to add more content, in fact I’m actually going to have to omit content. There’s going to be a lot of people there, so I have to limit the amount of time each person is there, to try to get as many people to play the game as possible, while, at the same time, not being pushy about it. What I can do, though is polish it up such that that little slice that people get to play is the best slice I can make it.
That, and I’ve been doing a lot of stuff out-of-game. I’ve got the company officially set up now, which is a weird notion. There’s competitions to enter, and prepare for. I still have to design the handouts for Comic-con, and other stuff in that vein.

Music Philosophy

Ladies and Gentlemen, my name is Isaac, and this is the first of several blog posts in which I’ll be discussing the music in Momentum.

Our music philosophy started simple: make it chill, so that people aren’t likely to rage and break their compy.

This idea, however, needed to be refined. As I began composing, our design quickly evolved into something more. I wanted to let people get lost in the music. I wanted people to be fully immersed into a simple place; a puzzle world in which, to reach your goals, the world bends to your whim–you simply close your eyes, and let yourself fall.

Additionally, I felt that to have anything in particular be a driving force would be a mistake–it would be conflicting with the gameplay. Instead, I felt that the music had to feel as though it was falling–that the force moving the music about was as unyielding and inevitable as gravity.

This feeling, of course, would change from song to song, but the touch of it had to be a familiar one.

So I had to consider a few things.

We began with the space. The space had to be enormous, abstract, and awe inspiring–a kind of foreign space that you can get lost in, but find yourself at peace. A place that you can marvel at the grandeur; where one can see the vastness of the universe, and our own small place inside of it.

Next, I considered the overall tempo. We decided it had to be graceful–I thought of it like a leaf, or a waterfall. It had to take it’s time, be unhurried; neither rushing about nor dragging it’s feet, It needed to get where it was going at precisely the right moment.

Music theory, I decided, was to be entirely ignored. I neither tried to adhere to, nor break any rules. I simply let myself write, and let the notes fall where they would. It would be another day that I decided if the song was bad or good.
And, admittedly, there were a lot of bad songs.

Anyways, now that I’m done being poetic, you all should join me later for some thoughts, oddities, and other commentary, as well as a preview of each of the songs in Momentum.

–Isaac

Tracks

So the next major hurdle was the tracks. When I made the first set of track pieces, I had little idea of where I was going with it, both stylistically, and technically. With the second track set, I nailed down what I wanted the first world’s tracks to look like, but it left much to be desired in terms of performance. Where I had gone wrong, primarily, was having separate materials for different parts of each piece: The concrete bits had a concrete material, the metal bits had a metal material, etc. While that makes total sense, it’s far more efficient for the engine if you shove all of that into a single material, and have different zones on the texture maps for each different sub-material. That way, it can batch all of that in a single draw call, instead of drawing each material separately. In fact, it cut my draw calls by 6 to 8-fold. Unfortunately, that meant the end result was effectively a brand new track set, even though it looked the same as the last, and therefore I had to re-create every single level I had made prior to then, hence the reason I hadn’t made many in the first place. I knew eventually I had to replace them.

But that’s not the only optimization I did. I also wrote a script that merges the meshes of each track upon level load. So, before the merge, it’s set up as a hierarchy. The rails are children of the bumpers, and the bumpers are children of the road piece. That means that every time I made a change to the transform of the road piece or its parent, (I.E., moved or rotated anything, which is the entire point of the game) that change had to propagate up to 6 more times, which, needless to say, created an unnecessary bottleneck.

So now it’s as efficient as I can think of how to make it presently, without sacrificing the quality of the physics.

First up: environment

Wall of text incoming.

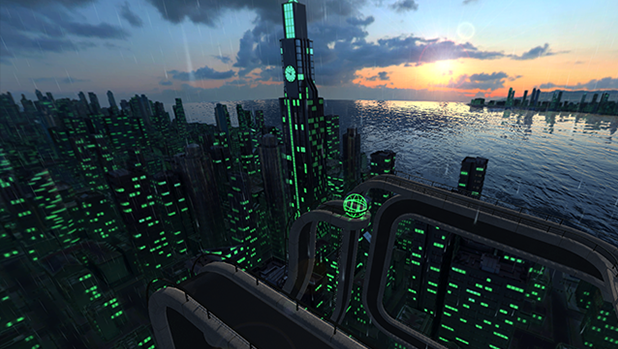
Holy crap. It took a long time but I’m done with it. So to recap, I had the original background, (the one in the trailer) totally sucked, both stylistically and functionally, so I determined I needed to replace it, but I knew it would take a while, so I made a temporary one, which was in the build at Game Wars. it was mostly functional, but utterly bland, and had entirely too much contrast, to boot.

What I ended up doing was this: In maya, I made about 20 buildings in 3 parts each: A base, a ‘floor’ and a top. I also made 2 special buildings that stand out from the others and aren’t at all copied, particularly, a government-type building and a clock tower. (in-game, the time on that clock is accurate to system time. subtle, but totally awesome) While I was doing that, I also wrote a mel script to take those buildings, and some road pieces and randomly generate from that a city, which I won’t delve into because it was actually a lengthy script. I actually had to generate it in 17 zones because not only was my script inefficient, my buildings prioritized fidelity over performance, given their end-use. Even had they been, though, the total area was about 200×200, (1 square being 1 building, road, or part of a multi-cell building) and 40,000-ish buildings is still a lot of buildings. So once I had the city, I needed to generate a cube map from that, so I rendered out the whole thing one piece at a time, so I could composite them later. Each piece needed multiple passes. Altogether there was about 150 renders that went into the final composite.

Then in Photoshop, I combined and composited all of those renders with a photographic sky, a panorama of the rocky mountains that I took from a hill close to home, and a public domain panorama of New York that I found. Most of the work there was in color correcting everything together and in masking by hand all of the lights in the windows. After all that was done, I could then export it as a cube map to Unity.

Once in Unity, I had to set it up all of the dynamic stuff. Separate from all the other renders, I had rendered a couple images of just a white cube, using the same lighting as the others. This allowed me to easily set up lighting that didn’t match, but closely resembled the background. I couldn’t entirely match it because I’m limited, in Unity, to a single directional light and an ambient term, for performance reasons, but it’s close. Then there’s the clock. Since I have the files that were rendered, I could determine precisely the position of the center of the clock relative to the camera. Since that vector is still valid post-render, I could simply make a little clock out of a couple of quads and a particle material, and place it there, and it’d appear to be on the clock.
After that, there’s the ocean. The ocean itself is just a quad with a pseudo-reflective material on it, then I took an animate tiled texture script, (just increments the offset of the texture by some vector every so often) re-tooled it to work with any given texture property, and applied it to the bump property, to simulate waves. Back when I exported the cube map, (as 6 separate .png files) I gave it an alpha, which doesn’t matter as far as the actual sky-box material is concerned, but it allowed me to make a cube that sits in front of the ocean and acts as a mask for it. A pretty neat, if totally ghetto solution.
Then I just needed to optimize the rain I had in the original environment, and I was done.